
Ever thought about making your own shoes? It might seem a bit hard at first, but with a few simple supplies and clear steps, you can make a pair that fits just right while showing off your unique style.
This guide walks you through everything, from sketching out your dream design to turning a basic mold into your final shoe. It’s like putting together your favorite pair of sneakers step by step. Get ready to see just how fun and simple it can be to create your own shoes!
How to Make Shoes: Complete Step-by-Step Process
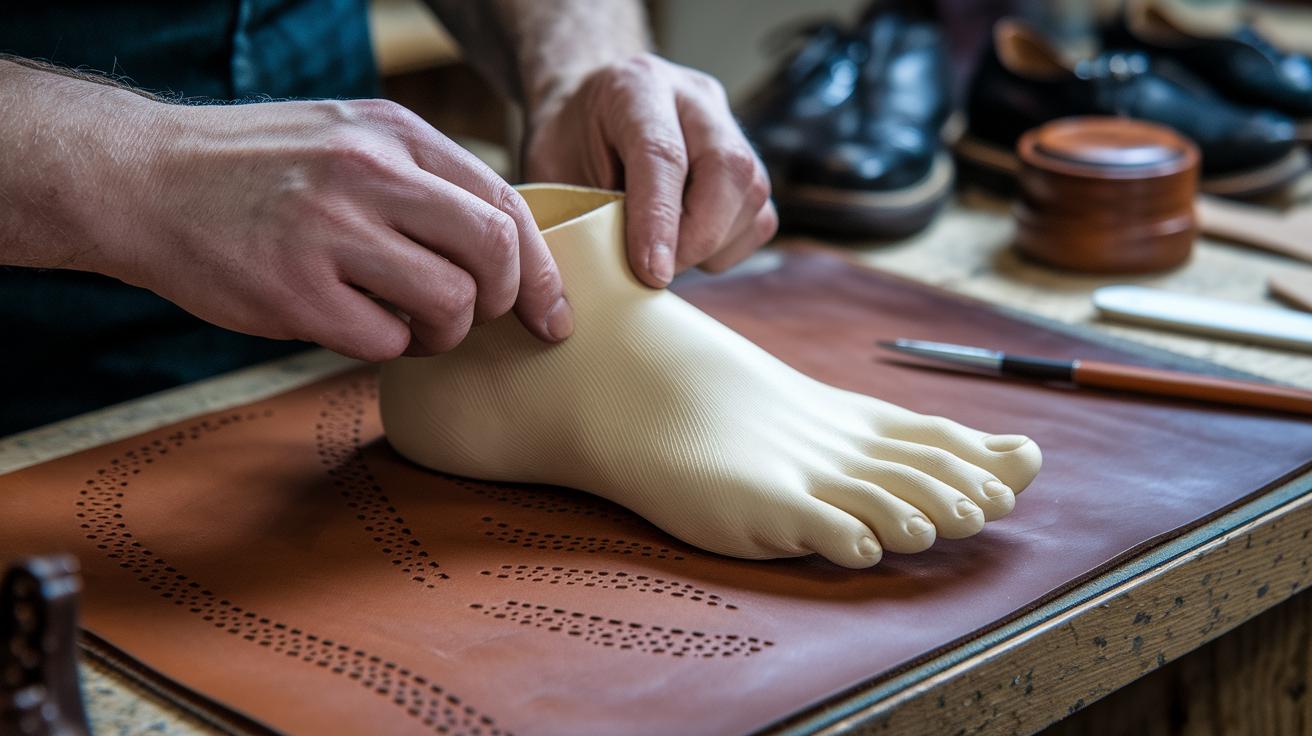
First, gather all your budget-friendly supplies at your local art or fabric store. Start by sketching your dream design – picture the style you want, just like chatting about your latest favorite pair. Next, mix a 13 oz bag of alginate (a material that helps form a mold of your foot) with about 5 cups of Permastone (a substance that hardens to hold your foot’s shape) to create a precise mold, or last.
Once the mold sets, wrap it with 2 to 3 layers of masking tape. This step smooths out the shape so it perfectly fits your foot, much like making your very own custom shoe form.
Now, turn your last into a detailed plan. Draft a 3-D pattern and then flatten it into a 2-D paper template with extra seam allowance – kind of like turning a cool idea into a practical blueprint.
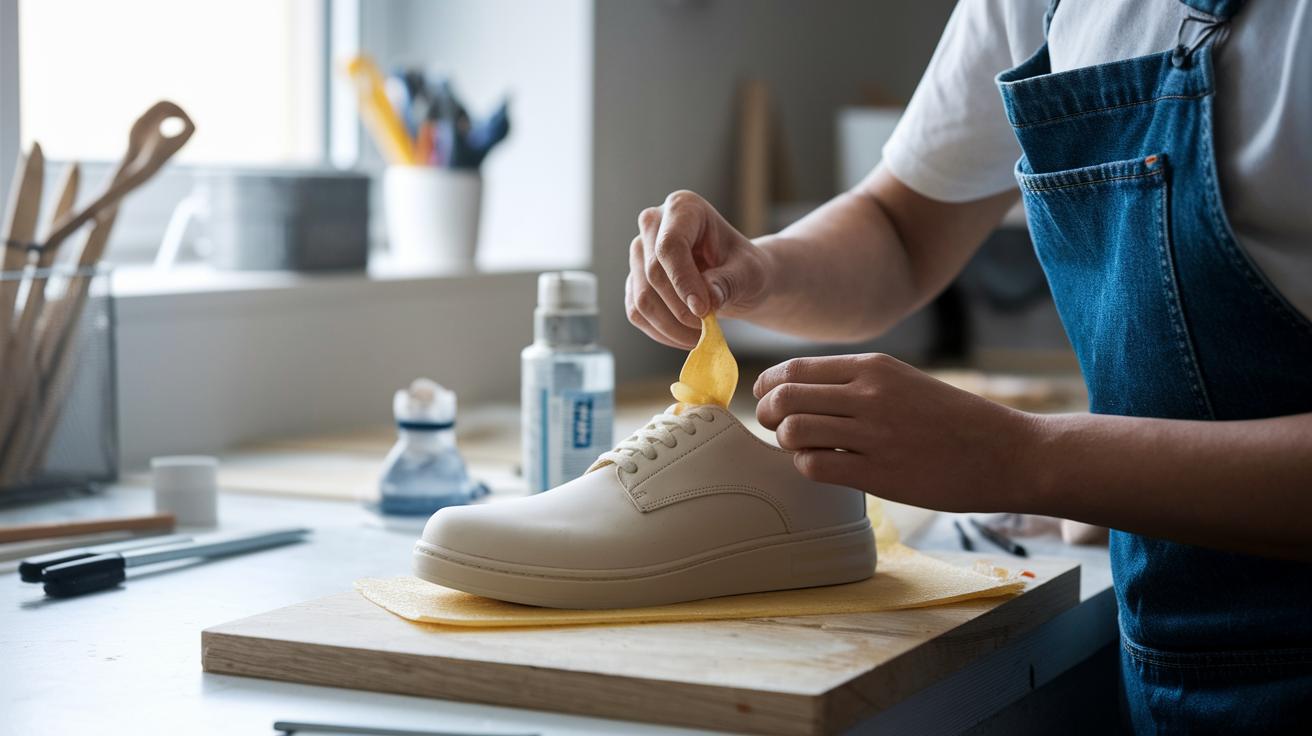
After that, pick your material, fabric or leather, and cut it out carefully. The guide walks you through every bit of the process: adding darts for a better fit, tying off stitches, and even pre-punching tiny holes in the leather to ease sewing.
The next phase is all about the sole. Soak your cork or leather sole for a full 24 hours, then secure it by cutting, sewing, trimming, and gluing the upper part to the sole. Imagine how satisfying it feels watching your shoe come together step by step.
- Sketch your shoe concept and style.
- Cast your foot using alginate (for a custom mold) and Permastone (to harden the mold) to form your last.
- Wrap the cast with masking tape to perfect its shape.
- Draft a 3-D pattern around the last, then flatten it into a 2-D template with extra seam allowance.
- Cut and pin your chosen fabric or leather pieces, ensuring you leave room for seams.
- Sew the upper parts together, adding details like darts and a tongue.
- Soak your cork or leather sole for 24 hours, then stitch the upper to the sole, trim, and glue everything in place.
- Add heels or treads if you fancy, then finish with a thin coat for a smooth look.
These steps will take you from a simple sketch to a unique pair of shoes. Don’t be afraid to experiment – maybe even try making a second pair to perfect your technique. And if you want to dive deeper into DIY shoemaking, check out the free 40-minute online course to boost your skills.
Essential Tools and Materials for Shoe Making
Ever been excited to start making your own shoes? We rounded up some budget-friendly supplies from local art and fabric shops to help you through every step, whether you’re building your own mold, drafting a pattern (a guide to shape your shoe), or piecing everything together.
| Material/Tool | Quantity | Notes |
|---|---|---|
| 13 oz Alginate | 1 bag | Makes molding your foot super simple |
| Permastone | 5 cups | Creates a solid base for your shoe form |
| Masking Tape | 2-3 layers | Helps smooth out and perfect your mold |
| Cork or Leather Soles | 1 set | Builds a sturdy foundation for your design |
| Outer Fabric or Leather | As needed | Select what you love for the shoe’s outer look |
| Strong Thread | 1 spool | Keeps your seams tight and lasting |
| Pattern Paper | 1 pad | Makes it easy to draft clear templates |
| Box Mold for Casting | 1 | Essential for starting your shoe’s mold |
Swing by your local craft or fabric store for these items so you can keep costs down while having fun with your DIY project. You’ll likely spot strong thread and pattern paper in most art shops, and hobby stores usually have alginate and Permastone. This handy list makes gathering everything you need a breeze, so you can start creating your custom shoes with total confidence.
Designing Your Shoes: Concept, Sketches, and Pattern Drafting
Start by sketching out your shoe design with a pencil. Think of drawing the cheerful outline of your favorite sneaker, quick, light sketches that capture the shoe’s vibe and all its small details.
Next, wrap your last with masking tape and use it to define your 3-D pattern lines. Try placing tracing paper over the taped surface so the lines come out crisp and clear. It’s like feeling each curve guide your hand as you mark along, simple and effective.
When you turn those 3-D shapes into 2-D templates, don’t forget to add seam allowances, usually about 1/4 inch to 1/2 inch. A neat trick is to print out a free PDF template, stick it onto cardboard, and check the pattern by feeling it. I once printed one, glued it to cardboard, and saw the pattern come together just right.
Creating the Shoe Last for a Perfect Fit in Shoe Making
First, round up your supplies: grab a box mold, a 13 oz bag of alginate (it’s about $8), 5 cups of Permastone, and some masking tape. These items help you create a custom mold of your foot without breaking the bank.
Next, slip your foot into the mold. Mix in the alginate slowly until it covers your foot completely. Then, immediately pour in the 5 cups of Permastone so every curve gets captured perfectly. Try stirring gently for about 30 seconds to ensure each area is coated evenly.
Once the cast has set into a rough last, carefully lift your foot out. Wrap the fresh form with two or three layers of masking tape. Press and shape the tape around your toes to create a snug fit that keeps everything smooth.
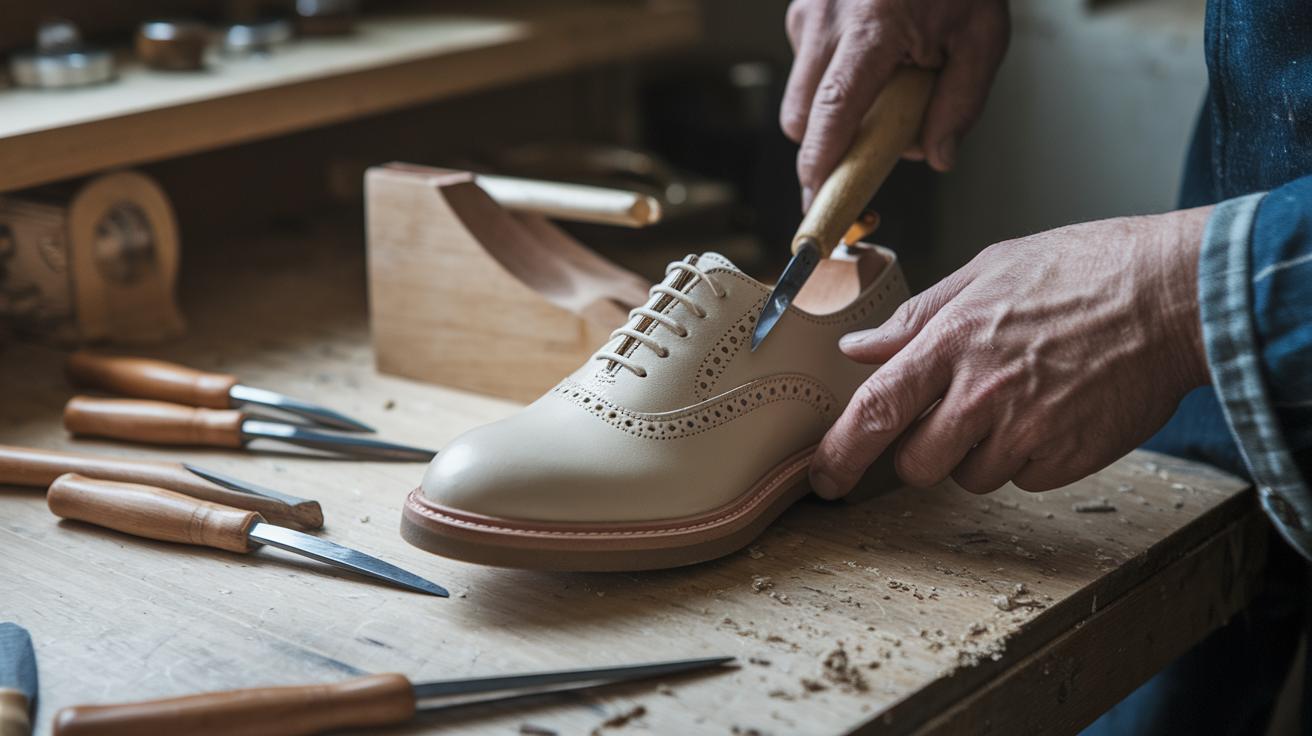
Finally, refine your last by sanding or trimming any high spots using simple tools like a hobby knife. Lightly sand those raised areas until the surface feels even and truly comfortable. Enjoy creating a shoe last that matches your foot’s unique profile!
Cutting and Sewing Shoe Uppers for Professional Shoe Making
Start by laying your paper patterns on your fabric or leather of choice and secure them with a few pins. Trace the outlines carefully, making sure to include seam allowances from your flat templates. Always double-check each traced outline before you cut, just like you’d review the blueprint of a favorite pair of sneakers.
Next, place your cut pieces over your shoe last to make sure they fit well, and add darts for a better shape. You can stitch by hand or use a machine, but if you’re working with thick leather, pre-punch a few holes so the machine can manage it better. And don’t forget to tie off every stitch securely at the spots that will get the most stress, kind of like making sure every link in a chain holds up.
After that, sew the outer layer and inner lining together, then flip the fabric inside-out to reveal neat, tucked edges. Carefully attach the tongue panel, and then use a punch tool to set the eyelets before threading your laces. These final steps pull everything together and build on the earlier work of cutting and stitching.
Assembling the Sole: Shoe Sole Creation and Attachment
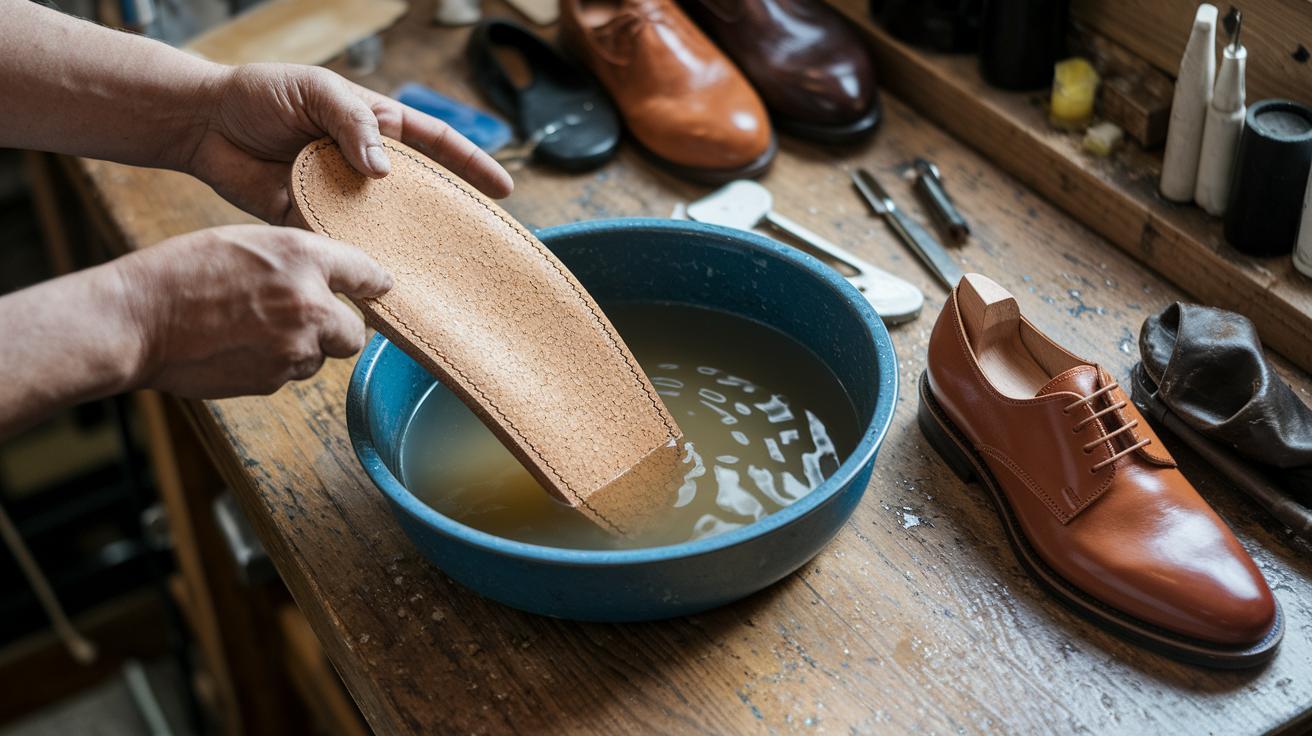
Start by soaking your cork or leather sole in water for 24 hours so it gets a soft, flexible feel, just like letting dough rest so it’s easier to shape. Once it's ready, secure an insole onto your shoe last and use it as a guide to cut an outer sole that perfectly matches its curves.
Next, take your upper material and carefully align it with the new sole. You can stitch or glue the edge along the entire perimeter using contact cement or a special shoe glue (a type of adhesive made just for shoes) to create a smooth bond. Think of it like snapping the final piece into a puzzle, where every curve falls right into place.
Finally, trim away any extra material until the edge is neat and even. Then, apply a thin layer of cement or leather dressing to fill in tiny gaps and make the connection stronger. For an extra boost in style and support, press a cork or leather heel layer into place. Imagine this step as adding the finishing touch to a handcrafted design, giving your shoes a polished look that’s ready for everyday adventures.
Finishing and Customizing Your Handmade Shoes
After stitching your shoes together, snip off any extra threads and check every seam to make sure it's neat and secure. Grab a soft cloth or a small brush and lightly coat the edges with a bit of dressing or leather polish. This step gives your shoes a soft shine that really brightens up the finish. A gentle wipe smooths out any rough spots, and a light sanding on the soles can create a cool, vintage feel that’s both timeless and inviting.
Next, have a little fun by adding your own creative touches. Consider using custom dye, embroidery (fancy stitching that adds a personal touch), or appliqués to make your shoes one-of-a-kind. A splash of color or a creative stitch here and there can transform a simple pair into a standout design. And hey, making a second pair might help you refine your technique, making every future creation even more enjoyable and truly reflective of your style.
Alternative Methods for Shoe Last Making in Shoe Crafting
Ever thought about making your own shoe last without the usual casting process? You can try out a bunch of creative methods inspired by old-school shoemakers who used everyday tools and materials to craft unique shoe forms.
One classic way is to carve your last out of a block of wood that’s free of knots. Use tools like a bandsaw, chisels, sanding machines, and files to shape it just right. Not into woodworking? No worries, grab some cardboard instead. Print out your PDF patterns, glue the pages onto pieces of cardboard, and carefully cut through the layers with a hobby knife. This lets you work at your own pace with supplies you probably already have at home.
If you’re after a modern twist, how about trying plaster gauze casting or even 3D printing for a fit that feels tailor-made? These options blend the charm of traditional craft with today’s innovative tech, giving you the best of both worlds.
Final Words
In the action of building a pair from scratch, we explored sketching ideas, crafting a custom last, piecing together uppers, and sealing every detail with smart sole assembly and finishing tweaks.
This guide showed a clear, step-by-step process to bring your design to life. Taking on how to make shoes at home is not just creative, it’s a fun, hands-on way to boost your style and confidence. Enjoy turning your vision into a pair you can proudly call your own.
FAQ
What is a shoe making kit?
A shoe making kit includes all the basic supplies like pattern paper, fabric or leather, soles, and necessary tools. It guides beginners through simple steps to create their own shoes at home.
How do I make shoes by hand at home as a beginner?
The process of making shoes by hand involves sketching your design, creating a foot mold (last), cutting pieces, sewing them together, and attaching the sole using affordable materials from art or fabric stores.
What do I need to create a shoe?
To create a shoe, you need materials such as alginate, Permastone, fabric or leather, cork or leather for the sole, strong thread, pattern paper, and basic tools like a hobby knife and sewing machine.
How is a shoe made step by step?
The step-by-step process starts with sketching your design, crafting a foot cast using alginate and Permastone, forming paper templates, sewing the uppers, and finally attaching and finishing the sole.
How can I make shoes for a school project?
Making shoes for a school project means following basic steps like drawing a design, using accessible materials, and assembling the shoe with simple techniques that are perfect for an educational project.
How can I create a shoe online?
Creating a shoe online typically involves using digital design tools and templates to plan your shoe, which you can then produce at home by gathering the necessary physical materials and following a hands-on process.
How can I start a shoe company?
Starting a shoe company begins by mastering shoe construction basics, refining your designs, sourcing quality but affordable materials, and slowly building a line of unique handcrafted footwear to market.
What are Maje shoes?
Maje shoes refer to a line from the Maje brand, recognized for their modern, stylish designs that blend classic elements with fresh details, perfect for those who appreciate chic and contemporary footwear.